Tilemap - RPG Tutorial 2
Today I wanted to talk about how to tilemap within Phaser. First, I wanted to share this really cool tool that is helpful when creating a tilemap Tiled, head on over and download the application or wait until you’ve read this entire post.

A tilemap is a grid map generated from (usually) reusable element blocks. The sharing of these blocks to paint the map/grid is a very efficient way to save on resource size. Below is an example of the tileset that I downloaded for use with these tutorial examples. Everything is 32px by 32px blocks.

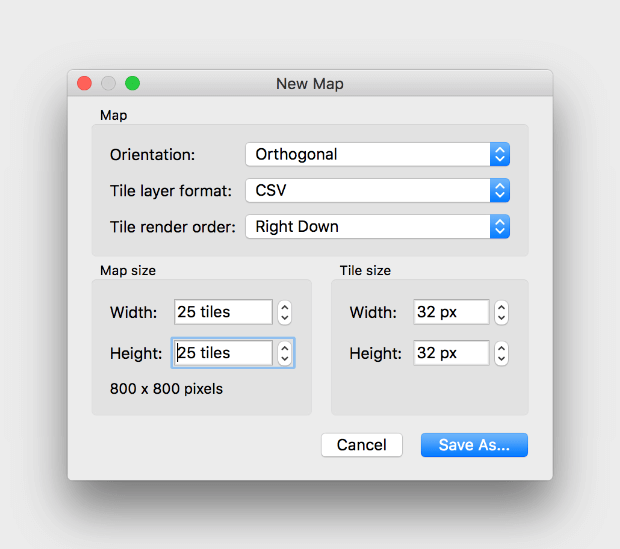
Now let’s take a look at the actual tilemap creator. Here are the settings I created for this tutorial when creating a new map with the Tiled Application.

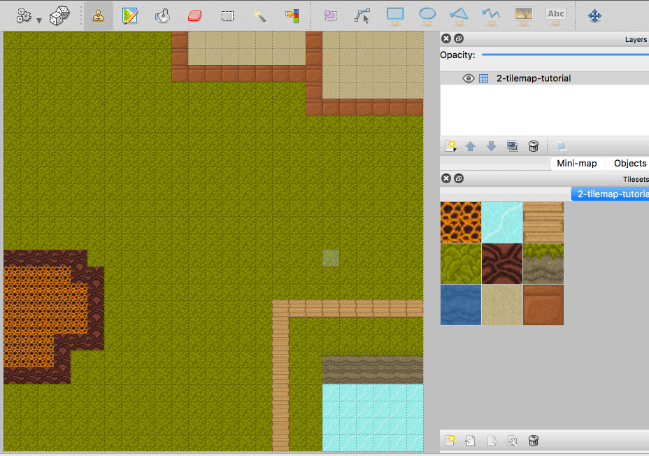
Import the tileset shown above and you will be able to create tilemaps as easy as shown below! This tool really is great… and free!
And a little more tweaking and bam, it’s a basic map.

That’s all fine and good but we have yet to do anything on the web, what is this post even about? Let’s do that right now! Below you will see that my new game init is a little bit bigger (double the size from the last tutorial) 400px by 400px. Again, if you don’t know where the code below goes… please go back to tutorial 1.
// create game
var game = new Phaser.Game(400, 400, Phaser.CANVAS, 'tutorial-2', config);
Now that we have the game map a little larger, let’s load in the actual tilemap. First, let’s preload the tilemapping .json file and the actual asset (as seen above… the tileset of 9 blocks), within our preload() function.
// preload tilemap
game.load.tilemap('tutorial-2-tilemap', 'tilemap/2-tilemap-tutorial.json', null, Phaser.Tilemap.TILED_JSON);

// preload tile asset for tilemap
game.load.image('tiles', 'tilemap/tileset-blocks-1.png');
If you don’t have the .json file yet, you can export the file from the Tiled application. *Please note, the .json does have a relative path to the asset being used, so that might have to change depending on your file structure and how you have things.
Below is the .json file that I exported, I am including it here to show you a few things to look out for:
{
  "height" : 25,
  "layers" : [{
    "data" : [4, 4, 4, 4, 4, 4, 4, 4, 4, 4, 9, 8, 8, 8, 8, 8, 8, 8, 9, 8, 8, 8, 8, 8, 8, 4, 4, 4, 4, 4, 4, 4, 4, 4, 4, 9, 8, 8, 8, 8, 8, 8, 8, 9, 8, 8, 8, 8, 8, 8, 4, 4, 4, 4, 4, 4, 4, 4, 4, 4, 9, 9, 9, 9, 9, 9, 9, 9, 9, 8, 8, 8, 8, 8, 8, 4, 4, 4, 4, 4, 4, 4, 4, 4, 4, 4, 4, 4, 4, 4, 4, 4, 4, 9, 8, 8, 8, 8, 8, 8, 4, 4, 4, 4, 4, 4, 4, 4, 4, 4, 4, 4, 4, 4, 4, 4, 4, 4, 9, 9, 9, 9, 9, 9, 9, 4, 4, 4, 4, 4, 4, 4, 4, 4, 4, 4, 4, 4, 4, 4, 4, 4, 4, 4, 4, 4, 4, 4, 4, 4, 4, 4, 4, 4, 4, 4, 4, 4, 4, 4, 4, 4, 4, 4, 4, 4, 4, 4, 4, 4, 4, 4, 4, 4, 4, 4, 4, 4, 4, 4, 4, 4, 4, 4, 4, 4, 4, 4, 4, 4, 4, 4, 4, 4, 4, 4, 4, 4, 4, 4, 4, 4, 4, 4, 4, 4, 4, 4, 4, 4, 4, 4, 4, 4, 4, 4, 4, 4, 4, 4, 4, 4, 4, 4, 4, 4, 4, 4, 4, 4, 4, 4, 4, 4, 4, 4, 4, 4, 4, 4, 4, 4, 4, 4, 4, 4, 4, 4, 4, 4, 4, 4, 4, 4, 4, 4, 4, 4, 4, 4, 4, 4, 4, 4, 4, 4, 4, 4, 4, 4, 4, 4, 4, 4, 4, 4, 4, 4, 4, 4, 4, 4, 4, 4, 4, 4, 4, 4, 4, 4, 4, 4, 4, 4, 4, 4, 4, 4, 4, 4, 4, 4, 4, 4, 4, 4, 4, 4, 4, 4, 4, 4, 4, 4, 4, 4, 4, 4, 4, 4, 4, 4, 4, 4, 4, 5, 5, 5, 5, 5, 4, 4, 4, 4, 4, 4, 4, 4, 4, 4, 4, 4, 4, 4, 4, 4, 4, 4, 4, 4, 1, 1, 1, 1, 5, 5, 4, 4, 4, 4, 4, 4, 4, 4, 4, 4, 4, 4, 4, 4, 4, 4, 4, 4, 4, 1, 1, 1, 1, 1, 5, 4, 4, 4, 4, 4, 4, 4, 4, 4, 4, 4, 4, 4, 4, 4, 4, 4, 4, 4, 1, 1, 1, 1, 1, 5, 4, 4, 4, 4, 4, 4, 4, 4, 4, 4, 3, 3, 3, 3, 3, 3, 3, 3, 3, 1, 1, 1, 1, 1, 5, 4, 4, 4, 4, 4, 4, 4, 4, 4, 4, 3, 4, 4, 4, 4, 4, 4, 4, 4, 1, 1, 1, 5, 5, 5, 4, 4, 4, 4, 4, 4, 4, 4, 4, 4, 3, 4, 4, 4, 4, 4, 4, 4, 4, 1, 1, 1, 5, 4, 4, 4, 4, 4, 4, 4, 4, 4, 4, 4, 4, 3, 4, 4, 6, 6, 6, 6, 6, 6, 5, 5, 5, 5, 4, 4, 4, 4, 4, 4, 4, 4, 4, 4, 4, 4, 3, 4, 4, 7, 7, 7, 7, 7, 7, 4, 4, 4, 4, 4, 4, 4, 4, 4, 4, 4, 4, 4, 4, 4, 4, 3, 4, 4, 2, 2, 2, 2, 2, 2, 4, 4, 4, 4, 4, 4, 4, 4, 4, 4, 4, 4, 4, 4, 4, 4, 3, 4, 4, 2, 2, 2, 2, 2, 2, 4, 4, 4, 4, 4, 4, 4, 4, 4, 4, 4, 4, 4, 4, 4, 4, 3, 4, 4, 2, 2, 2, 2, 2, 2, 4, 4, 4, 4, 4, 4, 4, 4, 4, 4, 4, 4, 4, 4, 4, 4, 3, 4, 4, 2, 2, 2, 2, 2, 2],
    "height" : 25,
    "name" : "tutorial-2_layer",
    "opacity" : 1,
    "type" : "tilelayer",
    "visible" : true,
    "width" : 25,
    "x" : 0,
    "y" : 0
  }],
  "nextobjectid" : 1,
  "orientation" : "orthogonal",
  "renderorder" : "right-down",
  "tiledversion" : "1.0.2",
  "tileheight" : 32,
  "tilesets" : [{
    "firstgid" : 1,
    "imageheight" : 96,
    "imagewidth" : 96,
    "image" : "tileset-blocks-1.png",
    "margin" : 0,
    "name" : "tutorial-2-tilemap_image",
    "spacing" : 0,
    "tileheight" : 32,
    "tilewidth" : 32
  }],
  "tilewidth" : 32,
  "type" : "map",
  "version" : 1,
  "width" : 25
}
Note: "name" : "tutorial-2_layer" and "name" : "tutorial-2-tilemap_image" make sure these match up with the below code name setting.
Now that we have everything preloading, let’s “load” them within our create() function and actually use and implement them!
// load up tilemap
map = game.add.tilemap('tutorial-2-tilemap');

// link loaded tileset image to map
map.addTilesetImage('tutorial-2-tilemap_image', 'tiles');

// create laye for said tileset and map now!
layer = map.createLayer('tutorial-2_layer');
Also notice the setting of the map and layer variables. Please make sure to add global variables right before or after the config variable we set.
// global vars
var map;
var layer;
Did it work?
If everything worked… you should see a painted map that you created!
Demo the thing…
What’s Next?
Wow… that is great, but you can’t see the entire map?! Why?!!1 Well, that is because we have a canvas that is only 400px by 400px and the tilemap is 800px by 800px (25 tiles each tile is 32px, like we set up in the new map image above), my next tutorial will show you how to move the map with our keyboard arrows! Yay!
View Files on Github
Download Source Files
If you would like the source files for this tutorial: Download source files
Please keep in mind, you must run these files within a local server environment, such as MAMP (because of cross origin requests) or I just noticed you can open it up in Firefox… will not work in Chrome unless within a local server environment… the more you know -_-